7.4 - Moving a Camera
In the previous lesson we discussed how a camera moves. Some movements require translation, some movements require rotation, and some movements require both. This lesson focuses on translating a camera. Remember that almost all camera motion is relative to the camera’s frame of reference.
Truck Motion
To truck a camera means you move a camera’s location laterally (left or right) while the camera’s direction of view remains unchanged. You can truck left or truck right. This is a translation along a camera’s u axis.
There are two basic ways to implement a truck camera motion:
- Modify the parameters of a call to the lookat function and then call lookat to create a camera transformation matrix, or
- Directly modify the definition of a camera’s position and coordinate axes.
Let’s solve the problem both ways.
Use lookat Parameters
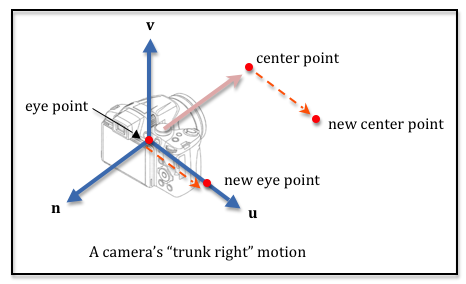
The function LookAt requires two points and one vector to set a camera transformation matrix. Specifically, it needs 1) the location of the camera, 2) the location of a point along it’s line of sight, and 3) what direction is upwards. A truck movement will obviously change the eye location of the camera. But the orientation of the camera must not change, so the center point needs to move as well. Both points need to move along a path defined by the camera’s u local coordinate system axis. The diagram illustrates a truck movement.
A truck function should allow for the distance of the truck motion to be specified as a parameter. If the distance is positive, the function should “truck right”, which will move the camera in the direction of the +u axis. If the distance is negative, the function should “truck left” , which will move the camera in the direction of the -u axis. The function must change the location of both the eye and the center points. The basic steps are:
- Calculate the camera’s u axis.
- Using a unit vector in the u axis direction, scale the vector by the move distance and then add this vector to both the eye and the center points.
The demo code below defines a LookAtCamera class that contains an eye point, a center point, and an up vector, along with a function called truck that will change them for a “truck” camera motion. Please do the following:
- Manipulate the controls in the demo to move the virtual camera to various locations and orientations and then hit the “truck” button repeatedly to “truck” the camera. Notice how the motion is relative to the camera’s frame of reference.
- Then examine the code in the LookAtCamera class.
- Then study the description of the code below the demo. (The demo code is editable if you want to experiment with the code.)
To investigate camera trucking motion:
- Manipulate the parameters of a lookAt() created virtual camera to position and orient a camera.
- Push the truck button below to "truck" from the camera's current position and orientation.
Manipulate the function lookAt(M, eye_x, eye_y, eye_z, center_x, center_y, center_z, up_dx, up_dy, up_dz)
| eye (0.0, 0.0, 5.0) | center (0.0, 0.0, 0.0) | up <0.0, 1.0, 0.0> |
| X: -5.0 +5.0 | X: -5.0 +5.0 | X: -1.0 +1.0 |
| Y: -5.0 +5.0 | Y: -5.0 +5.0 | Y: -1.0 +1.0 |
| Z: -5.0 +5.0 | Z: -5.0 +5.0 | Z: -1.0 +1.0 |
Each click of the truck button moves by 0.1 units along the u axis.
Code Description: The “truck’ function
The truck function uses the functionality in the Learn_webgl_point3 and Learn_webgl_vector3 classes to simplify the addition, subtraction, and scaling of points and vectors. Open these code files in your browser’s debugger if you are confused about what they are doing. The code comments are critical to understanding the code. Make sure you read the comments and compare them to the above diagram of a “truck” motion.
Code Description: The “LookAtCamera’ class
The constructor of the class creates the values needed to store a camera’s representation. It also creates instances of the Learn_webgl_matrix, Learn_webgl_point3, and Learn_webgl_vector3 classes so they are available for the processing in the truck function. You should only create these objects once and then re-use them as needed.
The eye, center, and up_vector are created as public variables so that the demo code can easily manipulate them. If you wanted to use better software engineering design, you could make these private variables of the class and only allow their manipulation through “getter” and “setter” functions.
Modify A Camera’s Definition
Let’s manipulate a camera using its basic definition: a location and three coordinate axes. We define a class called AxesCamera that stores the following data about a camera:
// Camera definition at the default camera location and orientation.
self.eye = P.create(0, 0, 0);  // (x,y,z), origin
self.u   = V.create(1, 0, 0);  // <dx,dy,dz>, +X axis
self.v   = V.create(0, 1, 0);  // <dx,dy,dz>, +Y axis
self.n   = V.create(0, 0, 1);  // <dx,dy,dz>, +Z axis
Notice that the eye value stores a camera’s location, while the three vectors store a camera’s orientation. If we don’t change the three vectors, the camera’s orientation will be unchanged. Therefore, to perform a trucking camera movement we only need to modify the eye value. A new version of our truck function looks like this:
function Truck(distance) {
  // Scale the u axis to the desired distance to move
  V.scale(u_scaled, self.u, distance);

  // Add the direction vector to the eye position.
  P.addVector(self.eye, self.eye, u_scaled);

  // Set the camera transformation. Since the only change is in location,
  // change only the values in the 4th column.
  self.transform[12] = -V.dotProduct(self.u, self.eye);
  self.transform[13] = -V.dotProduct(self.v, self.eye);
  self.transform[14] = -V.dotProduct(self.n, self.eye);
}
You can experiment with this version of the code using the following demo.
To investigate camera trucking motion:
- Manipulate the position and orientation of a camera.
- Push the truck button below to "truck" from the camera's current position and orientation.
Manipulate the camera's position and orientation:
| eye (0.0, 0.0, 5.0) | angle = 0.0 | |
| X: -5.0 +5.0 | Rotate about the camera's u axis: | |
| Y: -5.0 +5.0 | Rotate about the camera's v axis: | -180.0 +180.0 |
| Z: -5.0 +5.0 | Rotate about the camera's n axis: |
Each click of the truck button moves by 0.1 units along the u axis.
Summary
A camera movement that involves translation of a camera’s position follows a direction specified by one of the camera’s coordinate axes. If a camera is trucked, it follows the u axis. If a camera is pedestaled, it follows the v axis. And, if a camera is dollied, it follows the n axis.
Manipulating the actual camera definition (a point and 3 axes) requires less computation but more mathematical understanding of the camera matrix transform.
Glossary
- truck a camera
- Move a camera to its left or right, keeping its orientation unchanged.
- pedestal a camera
- Move a camera “up” or “down” from its current location, keeping its orientation unchanged. (“Up” and “down” are in quotes because they are relative directions based on a camera’s orientation.)
- dolly a camera
- Move a camera into or out-from its current line-of-sight, keeping its orientation unchanged.