10.4 - Texture Mapping Using Images
Texture mapping is a technique for specifying a unique color for every fragment that composes a triangle. The colors come from a mapping. Let’s review our discussion from lesson 3.7. In mathematics, a mapping is a function that converts a set of inputs into an output value. There are two basic ways this can be done:
- Lookup the output value from a list of possible values. This is called a ‘table lookup’.
- Perform calculations on the inputs to produce the output value.
This lesson explains the first mapping technique: how a triangle location can be mapped to a color value in a 2D image.
Hardware Overview
Texture mapping is fundamental to creating realistic renderings and the GPU’s hardware contains texture units to support texture mapping. When you hear the word unit in the context of computing, you should think processing unit. For example, a CPU (Central Processing Unit) is designed for general purpose computing; a GPU (Graphics Processing Unit) is designed for graphics computing, and a texture unit (emphasis on unit) is designed for texture map processing. WebGL compliant hardware must have at least eight texture units; many GPU’s have more than eight. You can query GPU hardware to determine how many texture units it has with the a call to gl.getParameter(gl.MAX_TEXTURE_IMAGE_UNITS).
A texture unit performs processing for texture mapping . A texture object stores the data needed for texture mapping. Together, a texture unit and a texture object can perform texture mapping in a shader program. You can create as many texture objects as your want, but the number of texture units in the GPU determines how many texture maps you can use concurrently in a shader program. This can be confusing, so let’s summarize these points again.
- texture unit:
- Performs the processing required for texture mapping.
- WebGL compliant hardware will always have at least eight texture units.
- The number of texture units determines how many texture maps you can use concurrently in a shader program.
- Remember that WebGL programs execute on a client’s hardware, not on a server’s hardware. A JavaScript program could query the client’s hardware using gl.getParameter() to determine how many texture units are available and then use appropriate shader programs for the hardware.
- texture object:
- Stores the data needed for texture mapping.
- A texture object is stored in the GPU’s memory.
- A texture object is different from a buffer object. A buffer object stores attributes of a model and is always a 1D array of FLOATS. A texture object is also a buffer for data, but its structure is more complex because it stores the parameters that control how texture mapping is performed and the texture mapping image.
- The size of a texture object is related to the size of the texture mapping image. You should make your texture mapping images as small as possible to conserve GPU memory.
- The only limit on the number of texture objects you can create is the size of the GPU’s memory.
Software Overview
Texture mapping maps a location in a 2D image to a location on a 3D triangle. WebGL uses texture coordinates to perform this mapping. As with so many other aspects of graphics, texture coordinates are percentages. The notation for texture coordinates uses (s,t) to represent an image location. The s component is a percentage of an image’s width, while the t component is a percentage of an image’s height. Each model vertex is assigned a texture coordinate and these coordinates are interpolated across the surface of the triangle to specify a unique location in the image for each triangle fragment.
The basic steps to create texture mapping are as follows:
- When building the model:
- Select an appropriate image for the texture mapping.
- Assign an appropriate texture coordinate, (s,t), to each vertex of a triangle.
- JavaScript pre-processing for a canvas rendering:
- Download the texture map image from the server.
- Create and fill a GPU texture object with the image.
- Set the parameters that control how the texture map image is used.
- Get the location of a uniform Sample2D variable from the shader program.
- JavaScript setup each time a model is rendered using a texture map:
- Bind a texture object to a texture unit
- Bind a texture unit to a uniform shader variable.
- Shader program
- In the vertex shader, creating a varying variable that will interpolate the texture coordinates across the surface of a triangle.
- In the fragment shader, use the texture coordinates to lookup a color from the texture image.
As you can see, there are many issues related to texture mapping, so we will discuss them one at a time in the order they are listed above.
1a. Select an Appropriate Image
Any digital image can be used as a texture map, but if the width and height of the image is not a power of 2, there are restrictions on how the image can be used. It is best to make the image have dimensions that are a power of 2, which makes texture mapping more efficient and removes any restrictions on its use. Therefore, each dimension of an image should be 1, 2, 4, 8, 16, 32, 64, 128, 256, 512, 1024, or 2048 pixels. Some devices support higher resolutions, but you should make the image as small as possible to save on downloads times and to save CPU and GPU memory. You should attempt to make the image resolution approximately the same size as the objects to be rendered in terms of the number of pixels that will be painted on a canvas.
Most image editors will allow you to change the resolution of an image, but if you don’t want the image to be distorted, you must consider the image’s aspect ratio – i.e., its width in relationship to its height. Typically you should crop an image to get the content you want and to make the aspect ratio be 1/1, 1/2, 1/4, 1/8, etc.. After you have the image’s content and aspect ratio correct, then change the image’s resolution (in pixels) to a power of 2.
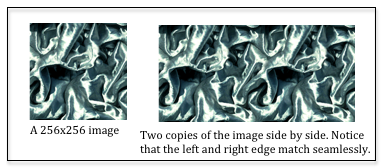
Some texture map images are designed to be tiled, which means that a single image can be placed next to itself and you can’t see where they join. Images that have their right edge match up with their left edge (and top edge to bottom edge) are non-trivial to design and create. Thankfully there are many sites on the internet that give away free images that can be tiled. Just do an search for “free texture map images that can be tiled”. Here is some sites that offer royalty free images for texture mapping:
The colors in a texture mapping image can be represented using RGB or RGBA colors. If you don’t care about transparency, you should use RGB values because it saves memory. If you want to make parts of an image transparent (because you want to use the image to represent a non-rectangular area, then you must use RGBA colors and set the alpha component for each pixel that you want to be invisible to zero. This requires a more sophisticated image editor such as Adobe Photoshop, or its open source equivalent, GIMP.
1b. Texture Coordinates
The texture coordinates assigned to each vertex of a model control the mapping of image colors to the triangle faces. The idea of texture coordinates is simple to understand, but the task of assigning texture coordinates to individual vertices can be complex. We will cover the big idea here and the next lesson will briefly discuss how to assign texture coordinates using Blender.

A texture coordinate is two fractions that represent a location in an image. The first fraction, called s, is the percentage from the left side of the image. The second fraction, called t, is the percentage from the bottom of the image. (The coordinate system for an image in WebGL has its origin in the lower-left corner, with the +S axis to the right, and the +T axis going up.) There are several examples of texture coordinates in the diagram to the right.
2a. Download Texture Images from the Server
For an OBJ model description, the file name of a texture map image is stored in the material properties assigned to a model. When you export a model that contains a texture map from Blender, the file name for a texture map image is stored as a map_Kd property of a material defined in the MTL file associated with the OBJ file. (Note that Kd is the diffuse property of the material. Therefore, the texture map image is expected to be used for the diffuse color of locations on a triangle’s surface.) A texture map image file must be downloaded, stored in a GPU texture object, and then used by a shader program when the model is rendered.
The JavaScript object Learn_webgl in the file Learn_webgl_02.js is designed to download all of the files needed for a WebGL program. The third parameter to the function is a list of OBJ models for your scene. When an OBJ file is retrieved from the server, any associated MTL files are also retrieved. After the MTL files are retrieved, any associated texture image files are retrieved. Only after all files have been retrieved from the server is a WebGL program started. If you are interested in the details, see the _downloadTextureMapImage function in the Learn_webgl class.
It should be noted that images come in a variety of data formats, such as gif, png, and jpeg. The web browser understands how to read and interpret all of the standard image encodings. When you create a JavaScript Image object, and specify the image’s src (source), the browser not only downloads the image but decodes it properly as well. This is huge! You don’t have to worry about any image decoding issues!
2b. Create Texture Objects in the GPU
When we render a model we want the model data to be storing in the GPU’s memory so that it is directly accessible to a shader program. To use an image as a table lookup for color values, we need the image to be accessible from the GPU’s memory as well. Since texture mapping is a fundamentally different operation as compared to gl.drawArrays(), the memory that stores a texture mapping image is called a texture object instead of a buffer object. A texture object stores an image and all of the related state variables needed to produce a texture mapping. You can create as many texture objects as a GPU has memory to store.
There are three basic steps to creating a texture object:
- Create a new texture object
- Set the parameters that control how the texture object is used.
- Copy an image into the texture object
The following function creates a texture object. Please read and study the comments before each command.
/**
 * Create and initialize a texture object
 * @param my_image Image A JavaScript Image object that contains the
 *                       texture map image.
 * @returns {WebGLTexture} A "texture object"
 * @private
 */
function _createTexture(my_image) {

  // Create a new "texture object"
  var texture_object = gl.createTexture();

  // Make the "texture object" be the active texture object. Only the
  // active object can be modified or used. This also declares that the
  // texture object will hold a texture of type gl.TEXTURE_2D. The type
  // of the texture, gl.TEXTURE_2D, can't be changed after this initialization.
  gl.bindTexture(gl.TEXTURE_2D, texture_object);

  // Set parameters of the texture object. We will set other properties
  // of the texture map as we develop more sophisticated texture maps.
  gl.texParameteri(gl.TEXTURE_2D, gl.TEXTURE_MIN_FILTER, gl.LINEAR);

  // Tell gl to flip the orientation of the image on the Y axis. Most
  // images have their origin in the upper-left corner. WebGL expects
  // the origin of an image to be in the lower-left corner.
  gl.pixelStorei(gl.UNPACK_FLIP_Y_WEBGL, 1);

  // Store in the image in the GPU's texture object
  gl.texImage2D(gl.TEXTURE_2D, 0, gl.RGB, gl.RGB, gl.UNSIGNED_BYTE, my_image);

  return texture_object;
}
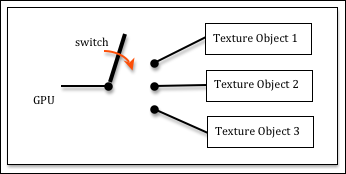
The concept of “binding to an object” is not part of modern programming languages and it deserves some detailed explanation. Remember that WebGL is a API (Application Programmer Interface) to a hardware graphics engine. The programming makes more sense if you think about the hardware. Imagine that a GPU has many texture objects and you want the hardware to make one of them be its “active” texture object. Then, conceptually, the GPU has to be connected to the texture object. In hardware, the way you connect things is by flipping a switch. So when you “bind an object” you are conceptually “flipping a switch” to connect components in the hardware.
There are many details associated with each of the above gl commands – too many details to cover in this overview. We will return to these commands in later lessons to discuss some of the details.
2c. Texture Parameters
The resolution of a texture map image is rarely the same as the resolution of a rendered 3D triangle. For example, an texture map image might be 128 by 128 pixels and a triangle using this texture map might cover 20 pixels in the canvas of a rendering. This is a large difference. And the opposite can happen. The triangle to be rendered might cover 100,000 pixels in the rendered image. The implication is that the texture map image has to be enlarged or shrunk to match the size of the 3D triangle. WebGL uses the terms “magnification” and “minification” for these ideas and you can control how “magnification” and “minification” are performed. Your choices are between speed or quality, but you can’t get both. The option names are based on how the associated algorithm works and not the results: gl.NEAREST selects the closest pixel to a location and gives you speed, while gl.LINEAR calculates a weighted average of the four pixels that surround a location, which produces a better color, but slows down rendering. The following example code will produce the best quality graphics, but slower rendering speeds.
gl.texParameteri(gl.TEXTURE_2D, gl.TEXTURE_MIN_FILTER, gl.LINEAR);
gl.texParameteri(gl.TEXTURE_2D, gl.TEXTURE_MAG_FILTER, gl.LINEAR);
Texture coordinates are percentage values between 0.0 and 1.0. What should WebGL do if a texture coordinate is outside this range? You have three options:
- gl.REPEAT: This takes the percentage’s fractional part as the texture coordinate. For example, a value of 2.75 would become 0.75. This has the effect of repeating the texture map over a large area. This is the way “tiling” is done. One same texture map image is re-used over a larger area.
- gl.CLAMP_TO_EDGE: This clamps all values greater than 1.0 to 1.0 and all values less than 0.0 to 0.0. Therefore the colors at the image’s borders are repeatedly used if the texture coordinates go outside the range 0.0 to 1.0. This is a good way to visually check for invalid texture coordinates, but it has very limited visual use.
- gl.MIRRORED_REPEAT: This inverts the fractional part of the coordinate. For example, 1.25 would be mapped to 0.75 because 1.0 - 0.25 = 0.75. The effect is to mirror the image about its edge. This makes the seam where the original image and the mirrored image “disappear”.
These parameters can be set differently for the s and t axes of a texture map, for example:
gl.texParameteri(gl.TEXTURE_2D, gl.TEXTURE_WRAP_S, gl.REPEAT);
gl.texParameteri(gl.TEXTURE_2D, gl.TEXTURE_WRAP_T, gl.MIRRORED_REPEAT);
The final pre-processing step is to get the location of the variable in your shader program that will access the texture map. This will be a variable of type uniform Sampler2D. We typically add this location to the shader program object, something like this:
program.u_Sampler = gl.getUniformLocation(program, "u_Sampler");
3. JavaScript Setup for Texture Mapping
Your shader program will have a uniform Sampler2D variable in its fragment shader. This variable must indicate which texture unit to use for texture mapping. But a texture unit needs data from a texture object. So we bind a texture object to a texture unit and then we set the uniform Sampler2D variable to the texture unit. An example is shown below.
// Make the "texture unit" 0 be the active texture unit.
gl.activeTexture(gl.TEXTURE0);

// Make the texture_object be the active texture. This binds the
// texture_object to "texture unit" 0.
gl.bindTexture(gl.TEXTURE_2D, texture_object);

// Tell the shader program to use "texture unit" 0
gl.uniform1i(program.u_Sampler, 0);
These three commands can be very confusing because they use different ways to specify texture units. When you make a texture unit active, you must use an enumerated type (ENUM) value: one of gl.TEXTURE0, gl.TEXTURE1, gl.TEXTURE2, etc. However, the shader variable that “points to” the texture unit is just an integer, 0, 1, 2, etc. I’m not sure why they made this inconsistency, but that is how it works. The enumerated values gl.TEXTURE0, gl.TEXTURE1, gl.TEXTURE2, etc. are guaranteed to be sequential, so you can spoecify the jth texture unit using the code gl.TEXTURE0 + j.
4. Shader Programs that use Texture Mapping
The shader programs that perform texture mapping are the easy part of this whole process. The vertex shader simply copies a vertex’s texture coordinates into a varying variable so they can be interpolated over the surface of a triangle. Here is an example vertex shader.
// Vertex Shader
precision mediump int;
precision mediump float;

// Scene transformation
uniform mat4 u_PVM_transform; // Projection, view, model transform

// Original model data
attribute vec3 a_Vertex;
attribute vec2 a_Texture_coordinate;

// Data (to be interpolated) that is passed on to the fragment shader
varying vec2 v_Texture_coordinate;

void main() {

  // Pass the vertex's texture coordinate to the fragment shader.
  v_Texture_coordinate = a_Texture_coordinate;

  // Transform the location of the vertex for the rest of the graphics pipeline
  gl_Position = u_PVM_transform * vec4(a_Vertex, 1.0);
}
The fragment shader uses the texture coordinates for a fragment to lookup a color in the texture map image. This is a common operation that is built into the GLSL functionality. You just call the texture2D function and specify the texture unit to use and the texture coordinates (which is a vec2, two floating point values).
// Fragment shader program
precision mediump int;
precision mediump float;

// The texture unit to use for the color lookup
uniform sampler2D u_Sampler;

// Data coming from the vertex shader
varying vec2 v_Texture_coordinate;

void main() {

  gl_FragColor = texture2D(u_Sampler, v_Texture_coordinate);
}
An Example
Glossary
- texture mapping
- A process that maps locations on a 3D triangle to a color value.
- procedural texture mapping
- The process that maps locations on a 3D triangle to a color value is based on calculations on the input parameters.
- image texture mapping
- The process that maps locations on a 3D triangle to a color value is a “table lookup” scheme that pulls colors from a 2D image.
- texture unit
- A special purpose processor inside a GPU that performs texture mapping.
- texture object
- A memory buffer in a GPU that stores the parameters that control a texture mapping process and stores a texture mapping image.
- tiling texture maps
- A texture map image that can be positioned next to itself, on any side, and the exact location where the images meet is not discernible.
- texture coordinates
- A pair of floating point values, (s,t), that specified a location in a texture map image. Both values are percentages, 0.0 to 1.0.
- binding
- Create a connection between components of a GPU.
References
The source of the example image for tiling is http://paulbourke.net/texture_colour/tiling/. This site also contains a good tutorial on texture coordinates.