1.1 - Introduction
Welcome to this “Learn WebGL” Web Site
This web site will help you learn how to display and manipulate real-time 3D computer graphics inside a web page. 3D computer graphics has the potential to create visualizations of anything your mind can imagine. But it’s not simple or easy to implement. So take your time and work methodically through the tutorials in this website.
Learning philosophy
Mastery learning is key to this set of tutorials. Mastery learning has been used with great success by the Kahn Academy and it is one of the main reasons why this set of tutorials was developed. Today’s students are ingrained in a system that conditions them to learn a little about a topic and then move on – regardless of how much they still don’t understand. As a student you need to re-think what it means to learn, and break your old habits of just ignoring things you don’t understand.
This site is designed on the principle that complex topics should be learned “top-down”. It is important that you understand the “big picture” before you dig into the details. As you learn the details you will have a framework that allows you to understand how the details accomplish a small part of a larger problem.
These tutorials are designed to be self-directed and self-paced. You are encouraged to stay with a topic until you understand it at more than a surface level. If you “master” each topic before going to the next topic, you will be prepared for the more detailed topics that follow. Please follow the flow of lessons as they are organized on the table-of-contents page. This will provide you with a firm foundation on which to understand the new topics.
What is WebGL?
WebGL is a JavaScript application programmer interface (API) that allows a programmer to use the graphics processing unit (GPU) of a computing device in a web browser window to render real-time 3D computer graphics. It is the only cross platform development environment for producing 3D computer graphics that the software industry has today. Learning WebGL is the best way to understand the basics of computer graphics while ending up with a “toolbox” that you can use to produce your own computer graphics.
What is a WebGL Program?
A typical web page that contains 3D computer graphics generated by a WebGL program is made up of these basic parts:
- A HTML (Hypertext Markup Language) description of the web page.
- A CSS (Cascading Style Sheet) that decribes how each element of the HTML description is formatted.
- A HTML canvas element in the web page that provides a rectangular area in which 3D computer graphics can be rendered.
- Graphical data that defines the 3D objects to be rendered.
- JavaScript programs that load your graphical data, configure your graphical data, render your graphical data, and code that responds to user events.
- OpenGL Shader programs that perform critical parts of the graphical rendering.
All of these basic parts initially reside on a web server. When a user (a client) requests a web page that contains 3D graphics, the data described above has to be transferred to the client’s computer, stored in correct places, and then processed by appropriate processors. Modern computing devices have multiple processors of different types.
- CPU’s – central processing units – are the “brains” of the device. CPU’s perform the general processing and run the operating system (OS) that controls the overall functioning of the device.
- GPU’s – graphics processing units – are specially designed to render 3D graphics.
Modern computing devices also have many types of memory designed for different purposes.
- RAM – random access memory – stores program data and program instructions.
- Graphics memory - a separate memory system for video and graphics processing. GPU’s have dedicated memory specifically designed for 3D graphics.
A simplified diagram of these ideas is shown below.
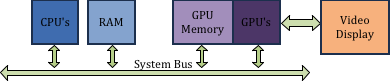
Major hardware pieces in a computing device
When a client requests a web page from a web server, the following sequence of events happen:
- The server sends the HTML description of the web page to the client and the client stores the web page in RAM.
- The client’s web browser (e.g., Chrome, Safari, Internet Explorer) reads the HTML page description and requests any other documents that are referenced in the HTML code, including images, JavaScript code, CSS (cascading style sheets), data files, etc. All of these files are stored in the client’s RAM.
- If there is JavaScript code associated with the page, it is
executed. For a page that contains 3D graphics, the JavaScript code
will perform the following tasks:
- It might request that other data files be downloaded from the server (for example, the data that describes the 3D graphic objects to be rendered).
- It will get and initialize the WebGL graphics context associated with the HTML canvas element where the graphics will be rendered.
- It will configure and copy the model data to the GPU’s memory. (Technically the data is copied to GPU’s vertex object buffers).
- It will establish “event handlers” that associate HTML events with JavaScript code that will execute when an event happens.
- Finally, the web page is rendered to a window in the browser and the web page waits for user events. Timer events can be set up to automatically generate events on a regular schedule, which can create animations of the 3D graphics.
When a JavaScript event handler initiates the rendering of graphics into a HTML canvas element, it tells the GPU which object buffer(s) contain the data it wants to render and then issues the WebGL “draw” command. Notice that the data to be rendered is usually already in the GPU memory. In a typical graphics program, the model data is copied to the GPU’s memory only once. This saves time and makes the graphics rendering efficient and fast. When we use the term “real-time graphics” we mean that rendering can be done in less than 1/30 of a second and the user can view smooth graphical animations. Such fast rendering is only possible if the transfer of data between the GPU’s memory and RAM is minimized.
The idea that expensive operations are only done once is a basic principle of all computer graphics. Throughout these tutorial you will continually see the phrases “preprocessing step” and “rendering step”. The goal is to perform the “preprocessing step” only once. Therefore the JavaScript code that performs graphics rendering is typically divided into two separate parts: 1) a setup (or preprocessing) part that is done once and 2) a rendering part that is performed each time an object is drawn. Each tutorial lesson will make a clear distinction between preprocessing code and rendering code.
To re-emphasize the “big picture,” the diagram below summarizes the above discussion. Note that the JavaScript code runs on the CPU(s) and the graphics rendering is done by the GPU(s). The JavaScript code is the “master”. It “runs the show” and tells the GPU(s) when and what to render.
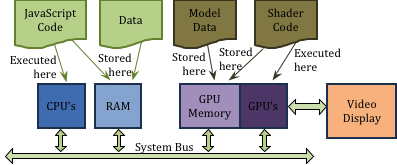
Where the different parts of a WebGL program are stored and executed
Tutorial Examples
A web page interface that allows you to view WebGL code, data, and the results of a WebGL rendering has been developed and an example is shown below. The interface will help you experiment with a WebGL program interactively. Remember, personal experimentation is critical to your learning! Pause when you come to the interactive examples and experiment!
The interface includes commands across the top of the interactive example that allow for the following options:
- Re-start - If you edit the code displayed in the left window panes, you can click the “re-start” button to reload the WebGL program using your modified code and/or data. If you introduce errors in the code or data the WebGL program will not execute properly, but you should see error messages displayed in the output window pane below the canvas. In some cases the errors will only be visible in the JavaScript console window. Some editor panes have editing disabled to prevent unintentional changes. All three edit panes below have editing disabled because you are not ready to experiment with the code yet.
- Show checkboxes - Allows you to hide any of the three display panels in the interactive example. Typically only one or two files will be presented in the edit windows. This will help you focus on a single piece of a WebGL program at one time.
- Download All - Downloads all of the files that make up this WebGL program to your computer’s default download folder. The number of files can be large, depending on the complexity of the example. To use the code in a stand-alone program the files will have to be organized appropriately in sub-folders. (More on this later.) It is recommended that you empty your download folder before downloading a WebGL program so you don’t miss any important files.
The interactive example below is shown here for you to familiarize yourself with the interface. All of the edit windows are read-only for this example. Simply examine the HTML, JavaScript, and model data to see what it looks like. You can interact with the graphics in this specific example by clicking and dragging your mouse in the canvas window. You can also enable or disable the automatic animation using the checkbox below the canvas window. If you would like to see the results of the WebGL program as a separate, independent page, use the hyperlink at the bottom of the interactive example. Depending on your default browser settings, the WebGL program will open in a new window or a new tab.
An example of using WebGL to render a 3D animated object.
Animate
Download the files for the example above and then look in you computer’s download folder at the files that were created. This will give you a feel for what is required for a WebGL program.
Summary
As you start learning WebGL, please remember to refer back to these “Big Picture” lessons to put the details into their proper place. The following lessons cover these “big picture” topics:
- What is 3D computer graphics and how does it work?
- Where did WebGL come from?
- How can the complexity of WebGL programs be managed?
Glossary
- mastery learning
- learn a foundational topic completely before moving on to harder more advanced topics.
- web server
- a program that runs on a server computer and stores web pages and related files. When a client computer requests a web page, the web server sends the requested files to the client.
- web browser
- a program that runs on a client computer which allows a user to download, view, and interact with web pages. Commonly used web browsers are Google Chrome, Mozilla Firefox, Apple Safari, and Microsoft Internet Explorer.
- CPU
- central processing unit - the hardware that controls a computing device and performs all of its calculations.
- GPU
- graphic processing unit - the hardware that is optimized to produce 3D computer graphics.
- RAM
- random access memory - where data and programs are stored for CPU access and manipulation.
- GPU memory
- where data and programs are stored for GPU access and manipulation.
- preprocessing step
- manipulation of data that happens once.