6.8 - Chaining Transformations - Adding a Forearm
The previous lesson demonstrated the initialization and use of matrix transforms. This lesson will demonstrate how to chain transforms together to produce complex motion.
A Robot Arm - The forearm
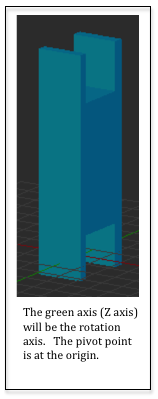
The previous demo rendered an object that represents the base of a robot arm. Let’s add a “forearm” linkage to the base. The forearm will pivot about the red pin in the base. For the forearm to pivot, its axis of rotation needs to be at the origin, so we design the model in Blender and place the position where the red pin will go through the forearm at the origin. This will be true of all the models you create. You design them so that they can be easily scaled and rotated about their local origin. Then the models can be moved to their desired location in a scene.
For the forearm, we want it to pivot about the red pin in the base. Since rotation is always about an axis, the rotation needs to come first. Then the arm can be moved to the location of the pin. Using a right-to-left ordering of the transformations, we have:
*rotateForearm
Eq1
But wait. The base is spinning. So we can’t simply move the forearm to the base. The same rotation that is happening to the base needs to happen to the forearm. So we apply the base rotation to the forearm as well, but after it has been rotated and translated. So our modelTransform looks like this:
*translateToPin
*rotateForearm
Eq2
Scene Rendering Initialization
The demo program below is a modified version of the code from the previous lesson. It adds a forearm model to the robot arm. We need two new transform matrices to manipulate the forearm. One transform will rotate the arm about the base’s pin. The rotation will possibly change on each new frame, so this matrix will be created in the initialization code but assigned its value in the frame rendering function. The translation matrix can be create and assigned its value once, since the distance to the pivot pin is constant and never changes. Study the example code and then review the code description below. If you want to experiment, the demo code is modifiable.
Adding a forearm to a robot base.
-90.0 +90.0 Forearm angle: 0.00 :
Animate
Concerning the pre-processing actions that happen once when the constructor code is executed:
| Lines | Description |
|---|---|
| 60-61 | Two new transforms are created to manipulate the forearm. |
| 64 | The translation for the forearm is set to a constant 2 units along Y. |
| 74 | A class variable is created to store the angle of the forearm. It is made public so the HTML slider event handler can change its value. |
| 153 | Buffer objects in the GPU are created and the model data is copied to the GPU for the forearm model. |
Rendering a Single Frame
Each time the scene needs to rendered, the render function in lines 79-103 is called. This function is identical to the previous demo version with the following exceptions:
| Lines | Description |
|---|---|
| 96 | The rotation matrix for the forearm is set because the rotation of the forearm can change on each frame. |
| 99-100 | The transform for the forearm is calculated. Notice that the base rotation is included. Also notice the ordering of the transforms from right to left. The order of the transforms is critical. |
| 103 | The forearm model is rendered using the calculated transform. |
